| Info |
|---|
Mode: Website Menu: Content >> File Manager |
Files and Images can be uploaded to yourSportzVault your SportzVault site and are maintained in the File Manager screen. All files and images stored under File Manager are available for use within your web site.
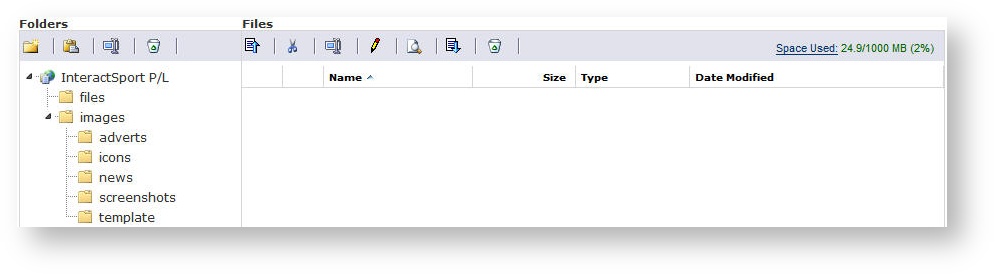 Image Removed
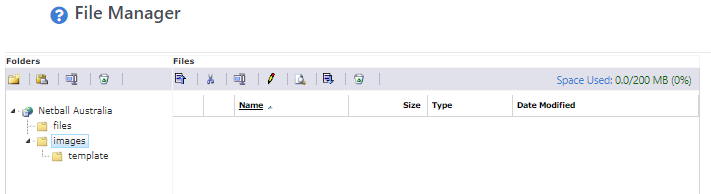 Image Added
Within your site you have two folders at the top (root) level:
- Files: Files can be any type of document (with certain exceptions) and would normally be uploaded so that a menu item can be assigned, or a link can be created on a Html page to the item. Examples are PDF documents, Word documents etc.
- Images: Images uploaded to SportzVault should only have the file extensions of .JPG .GIF or .PNG. They are normally uploaded so that they can be included 'inline' within a Html page, or a slideshow gallery. Images that have not been optimized for the web (such as BMP, TIF files) should not be uploaded, as they are typically too big in filesize for quick download and view. As a guide, images greater than 100KB should be optimized, and ideally an image should be less than 50KB. Most images obtained from digital cameras will be several MB in size, and the dimensions (height, width) will make them unsuitable for use. See below for further information about image optimization.
If your website uses skins (templates) there will be a
...
template sub folder under your
...
images folder. This should be used to upload images that are used within the skin template HTML files.
Whilst it isn't possible to create sub-folders at the root level, and number of sub-folders (to any depth) can be created within the files and images folders.
...
It is important to upload content to the correct location. For example, the Insert Image tool within the Html editor will only look in the images folder (and sub-folders of |
...
Whilst it isn't possible to create sub-folders at the root level, and number of sub-folders (to any depth) can be created within the files and images folders.
File Manager layout
The file manager consists of two sections:
| Expand |
|---|
| title | Folders section (on the left-hand side) |
|---|
|
The folders within your website are shown in a tree view on the left hand side. To select a folder click on the folder name. Any files in that folder will be displayed in the Files section, and any sub-folders of the selected folder will display within the tree view. Folder tools
At the top of the folders section is the folders toolbar. The tools are:
|
...
 Image Added Image Added | New folder | Creates a sub-folder underneath the selected folder. Note: folders cannot be created at the root level. |
|
...
 Image Added Image Added | Paste files | Moves files into the selected folder. Used in conjunction with the Files Cut tool. |
|
...
 Image Added Image Added | Rename folder | Renames the selected folder. Note: the top level folders cannot be renamed. |
|
...
 Image Added Image Added | Delete folder | Delete the selected folder. Note: the top level folders cannot be deleted. A folder that contains files or other sub folders cannot be deleted. |
|
...
| title | Files section (on the right-hand side) |
|---|
|
The files within the selected folder are shown in a table on the right hand side. To select a single file click on the row within the table. Some functions can work on multiple files at once, in which case check the checkbox (first column of the table) of files to be selected. The information displayed for each file is the file name, size (in KB), type of file, and date modified (this will usually be the date/time the file was uploaded). File tools
At the top of the files section is the files toolbar. The tools are:
|
...
 Image Added Image Added | Upload | Uploads files to the selected folder. |
|
...
 Image Added Image Added | Cut files | Used to move files into another folder. Used in conjunction with the Folders Paste files tool. |
|
...
 Image Added Image Added | Rename file | Renames the selected file. |
|
...
 Image Added Image Added | Edit file | Used to optimise (resize, re-dimension, crop) jpg images (not applicable for any other file type). |
|
...
 Image Added Image Added | Preview file | Pops up a quick preview of image files, and performs a download of other file types. |
|
...
 Image Added Image Added | Download file | Downloads the selected file so that it can saved on your computer. |
|
...
 Image Added Image Added | Delete file | Deletes the selected files. | | | Space used | Displays the amount of storage space in use. The first number is the amount (MB) in use, the second number is your storage limit. Note: You will not be able to upload files if they would result in your storage limit being exceeded. Please contact support if you require an increase to your storage limit. |
|
...
Tasks in more detail
...
|
- Select the folder to upload the file(s) to.
- Click the
|
...
- Image Added Upload tool (Files toolbar). This will open the Upload window.
- Click the
|
...
- Browse button and select the file to upload.
- If the file to be uploaded is a zip file (has a .zip extension):
- If you wish to simply upload the zip file and have it available on the site 'as is', leave the Unzip and delete .zip file after
|
...
- uploading checkbox unchecked
- If you wish to unzip the zip file and have all unzipped files available on the site, check the Unzip and delete .zip file after uploading checkbox. This option will also delete the zip file after unzipping.
- Also see the
|
...
- section Unzipping zip files below for further information about zip files
- If you wish to upload extra files, click the Add
|
...
- file button, then browse and select the file(s). You can upload a maximum of six files at once.
- Click the
|
...
- Upload button. The status of the upload will be displayed on the screen.
- Click the
|
...
- Close button to close the Upload window. The file(s) should now appear within the File Manager.
|
...
|
If you have a large number of Files or Images to upload, and/or file sizes are large (approaching or exceeding the 1MB individual item upload limit) then the files can first be zipped, transferred as a single file, and automatically unzipped after the upload is complete. Some points to note: - The zip file must be created using a normal zip file tool (e.g. WinZip or PKZip)
- Any directory information within the zip file is ignored, files are all placed within the Files or Images directory as appropriate
- Files/Images of the same name as those within the zip file will automatically be overwritten. No warning will be given.
- Only Files/Images with legal file extensions will be unzipped - i.e. those with 'Executable' extensions are never unzipped and only .jpg .gif .png extensions are unzipped for the case of an 'Image' upload
- Zip files uploaded for unzipping on the server will always be deleted on the server after unzipping. This is to save your file space.
- If uploading and unzipping a file would result in exceeding your space allowance, the action is not allowed.
Case study: Uploading a large number of images - Create the zip file using your zip tool. Include as many images (.jpg, .gif, .png) as you like, provided the total uncompressed size of the images does not exceed your space allowance.
- To speed the upload process, select the maximum compression that you can when creating the zip file.
- Follow the instructions above -To upload an Image (File)
Case study: Uploading a large document - Zip the document using your zip tool.
- To speed the upload process, select the maximum compression that you can when creating the zip file.
- Follow the instructions above -To upload an File, ensure the Unzip and delete .zip file after
|
...
- uploading checkbox is checked
In some cases you may wish to upload a zip file for future download (ie without unzipping). In this case uncheck the checkbox. |
...
| Note |
|---|
Most documents compress substantially when zipped. This can substantially reduce the amount of time taken to upload the document to |
|
...
| Expand |
|---|
| title | To rename a File (or image) |
|---|
|
- Select the folder containing the file by clicking the folder name.
- Select the file by clicking the appropriate row in the Files table.
- Click the
|
...
- Image Added Rename tool (Files toolbar).
- The file name will become editable, edit as required. Note - the extension cannot be that of an 'executable' file, and certain characters are not allowed in filenames (e.g. \ /).
- When finished editing the name, press the Enter key. At the confirmation box click OK to commit your changes, or Cancel to abandon your changes.
|
...
If the file/image is attached to a menu item, or is the target of a link in any Html page, renaming the item will break that link. You should ensure that there are no dependencies on the file/image before renaming. |
|
| Expand |
|---|
| title | To preview a File (or image) |
|---|
|
- Select the folder containing the file by clicking the folder name.
- Select the file by clicking the appropriate row in the Files table.
- Click the
|
...
- Image Added Preview tool (Files toolbar).
- For images, a preview box will open. For other types of files you will be prompted to download the file.
|
| Expand |
|---|
| title | To download a File (or image) |
|---|
|
- Select the folder containing the file by clicking the folder name.
- Select the file by clicking the appropriate row in the Files table.
- Click the
|
...
- Image Added Download tool (Files toolbar).
- You will be prompted to save the file to your computer.
|
| Expand |
|---|
|
JPG images can be optimised after being uploaded via the edit tool. A range of image editing tools are available for jpg images, including resize, optimising (changing the quality), cropping etc, however these tools are basic, and ideally images should be optimised before uploading. Note - other image formats (GIF, PNG) cannot be edited using this tool. More information about image optimization can be found here: (1), (2), (3). - Select the folder containing the file by clicking the folder name.
- Select the file by clicking the appropriate row in the Files table.
- Click the
|
...
- Image Added Edit tool (Files toolbar).
- The Image editor screen will open, follow instructions on that screen to edit/optimise your JPG image.
|
...
...
|
- Select the folder containing the file(s) by clicking the folder name.
- Select the file by clicking the appropriate row in the Files table. If you wish to delete several files at once, check the check box next to the file name.
- Click the
|
...
- Image Added Deleted tool (Files toolbar).
- You will be prompted to confirm the deletion. If you click OK, files are immediately deleted.
|
...
If the file/image is attached to a menu item, or is the target of a link in any Html page, deleting the item will break that link. You should ensure that there are no dependencies on the file/image before deleting. |
|
...
...
...
|
- Select the folder containing the file(s) by clicking the folder name.
- Select the file by clicking the appropriate row in the Files table. If you wish to move several files at once, check the check box next to the file name.
- Click the
|
...
- Image Added Cut tool (Files toolbar).
- Select the folder that you want to move the files into by clicking the folder name.
- Click the
|
...
- Image Added Paste tool (Folders toolbar).
- You will be prompted to confirm the move. If you click OK, files are immediately moved.
|
...
| Warning |
|---|
If the file/image is attached to a menu item, or is the target of a link in any Html page, moving the item will break that link. You should ensure that there are no dependencies on the file/image before moving. |
|
...
|
- Select the folder to create the sub-folder within by clicking the folder name.
- Click the
|
...
- Image Added New folder tool (Folders toolbar).
- A folder will be added under the current folder with the default name New folder
- Edit the name of the folder and press the Enter key. The folder will be added.
|
...
You create folders at the top level (ie the same level as the files or images folders).
|
|
...
|
- Select the folder by clicking the folder name.
- Click the
|
...
- Image AddedRename tool (Folders toolbar).
- The file name will become editable, edit as required.
- When finished editing the name, press the Enter key. At the confirmation box click OK to commit your changes, or Cancel to abandon your changes.
|
...
You cannot rename the top level files or images folders. |
|
...
If the folder contains files/images that are attached to a menu item, or are the target of a link in any Html page, renaming the folder will break these links. You should ensure that there are no dependencies these files/images before renaming. |
|
...
|
Folders cannot contain any files or sub folders to be deleted. If this is the case, you will first need to delete/move these items before deleting the folder. - Select the folder by clicking the folder name.
- Click the
|
...
- Image Added Deleted tool (Folders toolbar).
- You will be prompted to confirm the deletion. If you click OK, the folder is immediately deleted.
|
...
You cannot delete the top level files or images folders. |
|
General restrictions
- 'Executable' Files with certain extensions cannot be uploaded (e.g. .exe .bat etc)
- Offensive or pornographic content is not permitted, and can result in suspension or termination of a SportzVault site
Files up to 5MB in size can be uploaded.
Note - uploading | Note |
|---|
Uploading a compressed file via a zip file (see below) is a way of getting around this restriction. |
- Once your space allowance is exceeded you will not be able to upload further files or images. Also, uploads are not allowed that would cause the allowance to be exceeded. To be able to upload new files, you must first either delete existing files, or contact us to arrange an increase to your space allowance.<rvc:link< li="">
...
- The larger the file to be uploaded, the longer it will take to upload. This is mainly dependent on the speed of your Internet connection. For example, to upload a 1MB file with a dial up connection can take over 5 minutes. Consider this when uploading large files or images on the site. A visitor to your web site who needs to access this content may see slow performance if file sizes are large. Minimise file/image size as much as possible - general rules of thumb are:
- try to restrict the size of any image within your page to 20-50KB. The more images that display on a page, the more you would want to reduce the size of each image. By using the Slideshow Gallery feature of SportzVault to display photos, you can go for larger size images (say 50-100KB), as only one is shown on the screen at once (thumbnails are generated for all images, but these are typically very small)
- if you link to a document (e.g. PDF, Word document etc) try to restrict this to less than 100KB, particularly if the document is something that is accessed regularly( e.g. a form). Larger files are OK for occasional downloads - e.g. a most users wouldn't mind waiting several minutes to download a large PDF manual that they could then save to their hard drive
- always consider the users of your site - particularly if you have a fast (e.g broadband) Internet connection. Some people don't, and would see a much slower response.
- it is best to optimise images to reduce the
filesize - file size before they are uploaded, and this can done by a range of tools (eg Microsoft Photo Editor) or free tools (do a search on Google or Tucows for 'Image Optimizer').
- More information about image optimization can be found here: (1), (2), (3).
- As a guide, image dimensions should be less than 800 pixels wide by 800 pixels high. Larger dimensions lead to a larger filesize
, - and will cause the image to scroll off the screen for some users
- Certain images can also be optimised/edited after being uploaded, by clicking the 'Edit' link next to the image, choosing 'Resize Image', and reducing the image dimensions and/or the image quality (which affects how much the image is compressed) - usually a quality of 60 will result in a much smaller file with no
noticable - noticeable differences when viewed over the web. Lower qualities can result in
noticable - noticeable compression artifacts, it is best to experiment with this.