Welcome to ResultsVault
Please take a few minutes to read through this getting started guide, which provides an overview of the core features of ResultsVault and aims to help new users familiarise themselves with the software and complete some key tasks.
Once logged into ResultsVault, detailed help files are also found on each screen, specifically for that task.
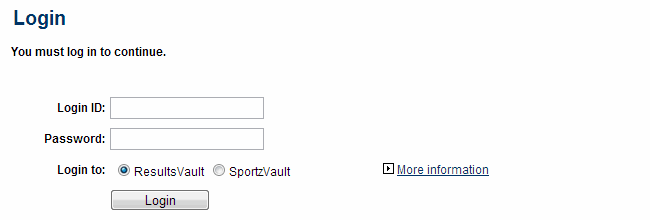
Logging into ResultsVault
A Welcome email is sent to all new users containing a Login ID and Password with a link to the Administration page.
Navigating the Administration Menu
Navigating ResultVault is performed via a series of menus organised into a set of 4 task-specific modes.

Mode | Description | Top Level Menus |
Organisation | Organisation contacts and office bearers and details, Member Signup, Account Management and User Maintenance. | Organisation, Webstore, People, Members, Users, Help. |
Competition Management | All competition management functions including grade and fixture management, ladders, umpire management, reports, etc. | Competition, People, Players, Umpires/Referees, Communications, Reports, Help |
Competition Participation | This mode is used by Associations that manage teams that participate in competitions run by another organisation (Eg: Representative teams) Functions include team selection, match results / player score entry and registering players to a governing body | Matches, Teams, People, Members, Players, Communications, Configuration, Help |
Website (SportzVault) | Only available to organisations with a SportzVault website this mode is for managing online content. | Content, Site, Webstore, SportzVault Options, Help |
Where to begin?
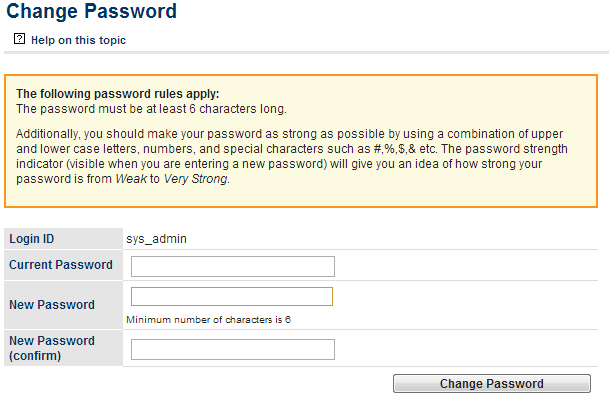
As a starting point we suggest a change of password to something more memorable. To do this navigate to
| Info |
|---|
| MODE: Organisation MENU: Users -> My Account -> Change Password |
The new password must be at least 6 characters long and should ideally contains a mixture of numbers, capital and lower case letters (other forms of punctuation are also acceptable).
Now that that is taken care of the real work can begin. ResultVault offers a Competition Setup Wizard and we recommended starting therethere.
| Info |
|---|
| MODE: Competition Management MENU: Competition -> Setup Wizard |
Each step can be performed via the standard ResultsVault menus, navigation directions and a brief description are provided for each below the following screen.
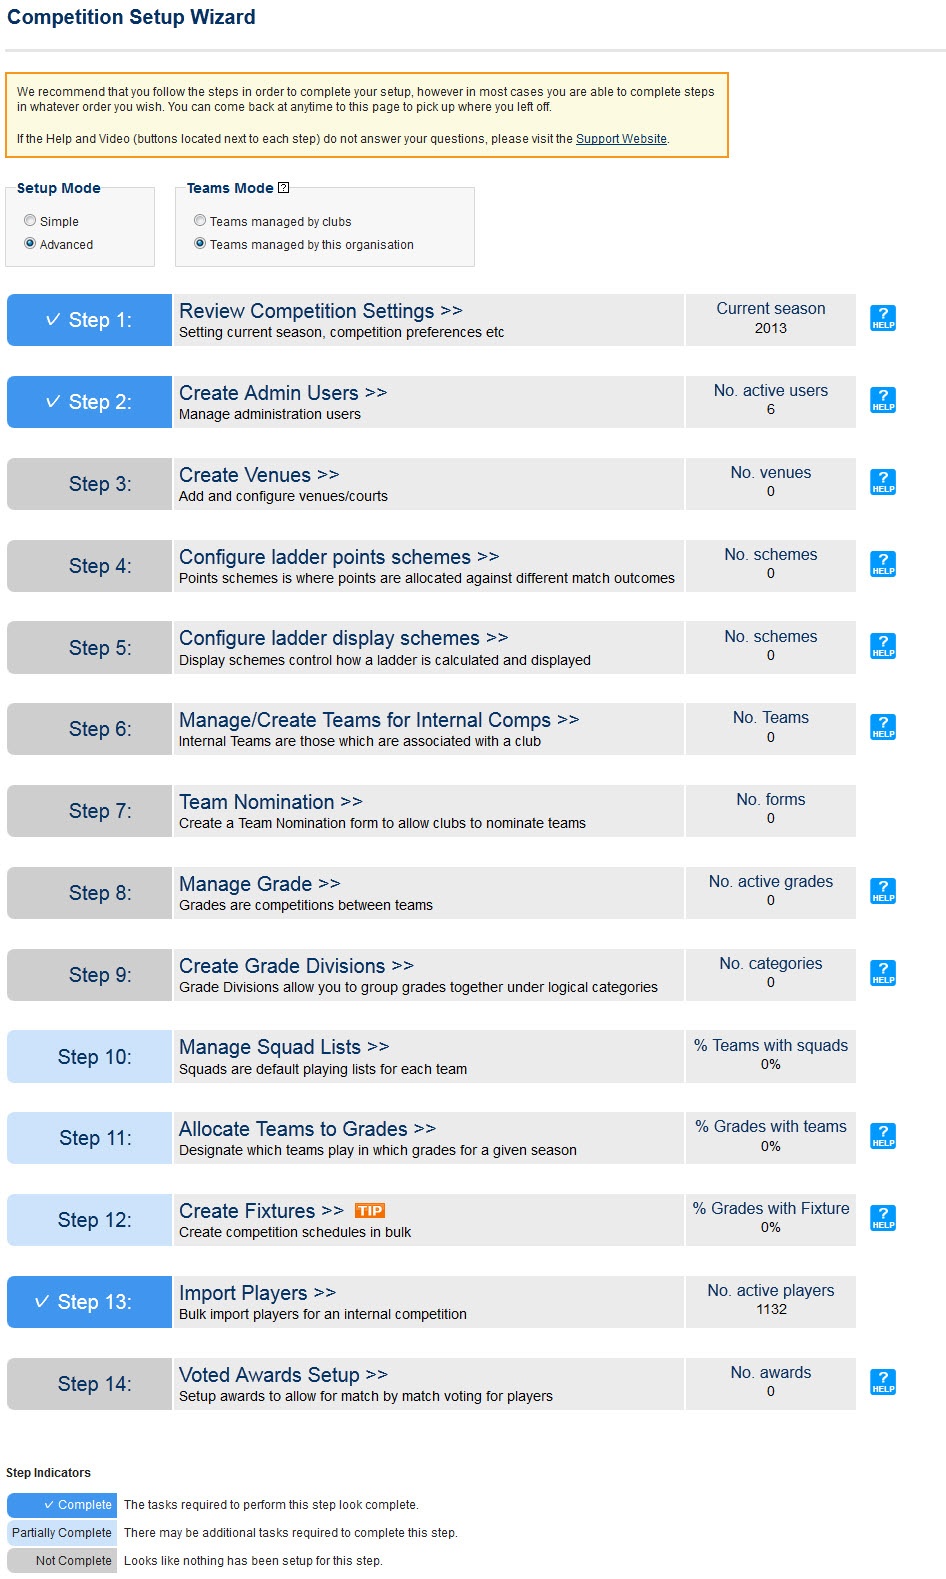
Step 1: Review Competition Settings
| Info |
|---|
| MODE: Competition Management MENU: Competition -> Competition Settings |
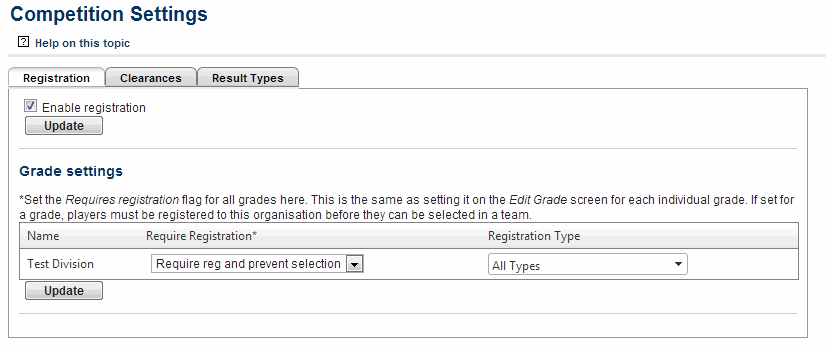
The most important action to perform here is to set the current season for the association and its affiliates. Other tasks that can be performed here include managing the past Season List, Clearance set up and Result type configuration. This page is in the process of redevelopment and references to player registration will soon be removed.
The current season is set for the association using the drop-down list and update button. The current season for all affiliated child organisations can be set using the go button.
...
The list of result options that will be available when entering results is configured here.
Step 2: Create Admin Users
| Info |
|---|
| MODE: Organisation MENU: Users -> User List |
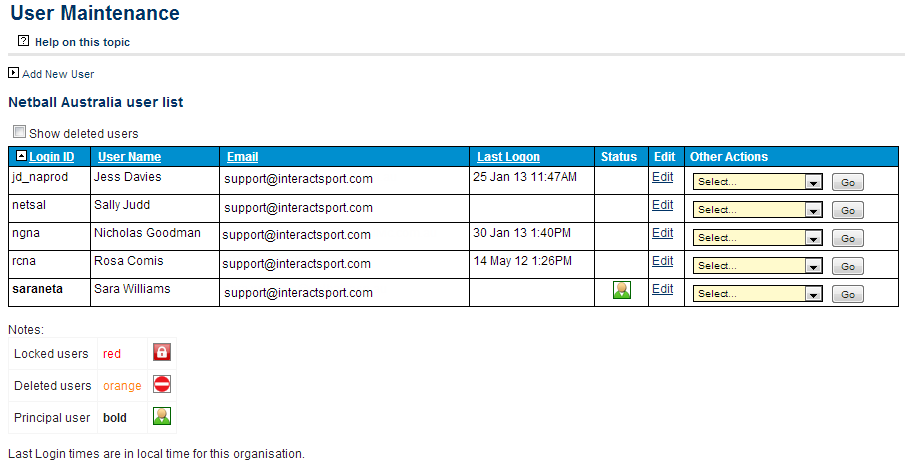
Additional users can be created to assist with admin tasks. The level of access a user has is determined by the User Roles assigned to them.
...
| Field | Description |
|---|---|
| Login ID | This must be unique. An abbreviation of the association's name in combination with the users name or a number are the recommended format. |
| User Name | The name of the person that uses this ID. When a person leaves an organisation the User name and password can be changed to allow a new person to use the existing Login ID |
| A valid email address must be provided. The welcome email which contains the user's Login ID and password will be sent to this address. It will also be used for password recovery and any system notifications sent to this user | |
| User Roles | These determine the pages and functions that the user will be able to access. See the 'help on this topic' page or glossary of ResultsVault terms for more information on user roles. |
Step 3: Create Venues
| Info |
|---|
| MODE: Competition Management MENU: Competition -> Venues -> Manage Venues |
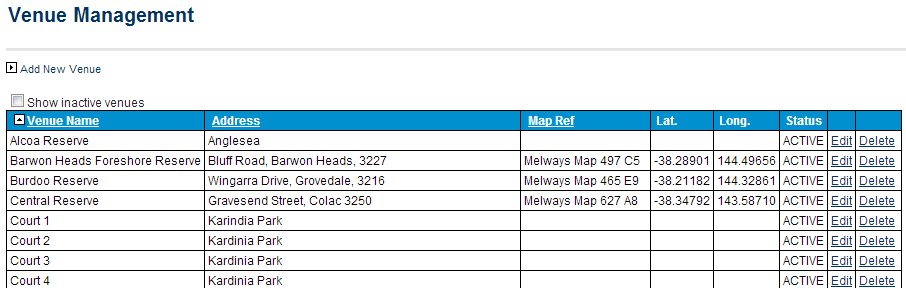
To create a new venue, click on the add new venue link in the top left corner of the page.
...
| Info | ||
|---|---|---|
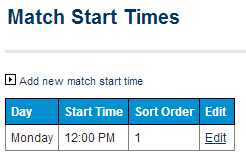
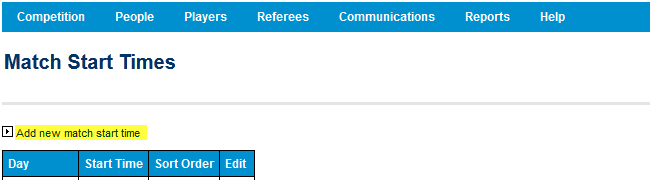
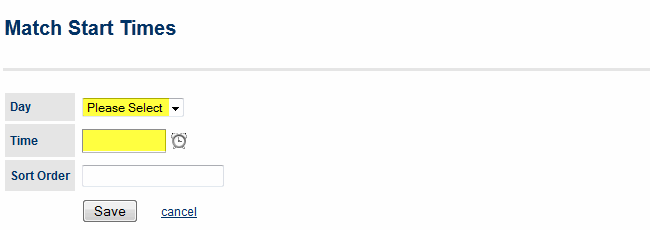
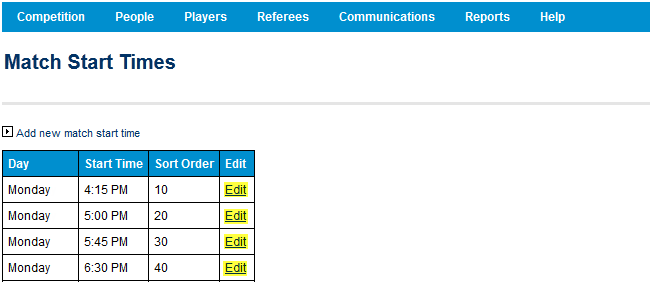
It is also recommended that match start times for fixture slots be created at this stage.
Fixture start times are used in combination with venues to create fixture slots, a specific time that a specific court will be available for a match each week. To create a new start time, click Add new match start time. Select a day and enter a playing time. The sort order determines the ordering of your start times with lower values at the top of the list and higher values at the bottom of the list. |
Step 4: Configure Ladder Points Scheme
| Info |
|---|
| MODE: Competition Management MENU: Competition -> Ladders -> Maintain Ladder Point Schemes |
To create a ladder points scheme use the add new ladder points scheme link in the top left corner of the page.
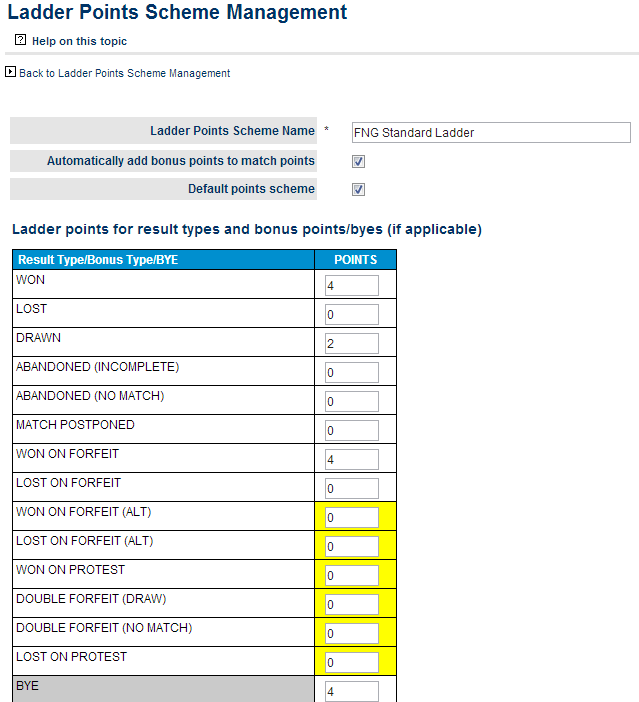
Ladder points schemes are applied to grades to tell the automatic ladder calculations how to process match results. If all of your grades are the same they can all use the same scheme or alternate schemes can be created for different competitions.
Point values are assigned result types and match events and ladders are automatically calculated overnight after results have been entered.
Step 5: Configure Ladder Display Schemes
| Info |
|---|
| MODE: Competition Management MENU: Competition -> Ladders -> Maintain Ladder Display Schemes |
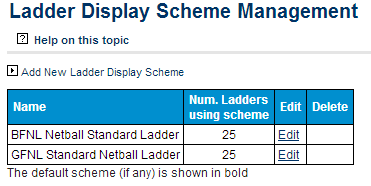
Ladder display schemes are used to vary the way ladders display in the public portal.
To create a ladder points scheme use the add new ladder display scheme link in the top left corner of the page.
Step 6: Manage Affiliate Organisations / Manage Teams for Internal Competition
This option will vary depending on the team mode selected but in both cases it refers to managing the teams that will be competing in competitions.
Teams Managed by Clubs
| Info |
|---|
| MODE: Competition Management MENU: Competition -> Teams and Affiliates -> Child Organisations (affiliates) |
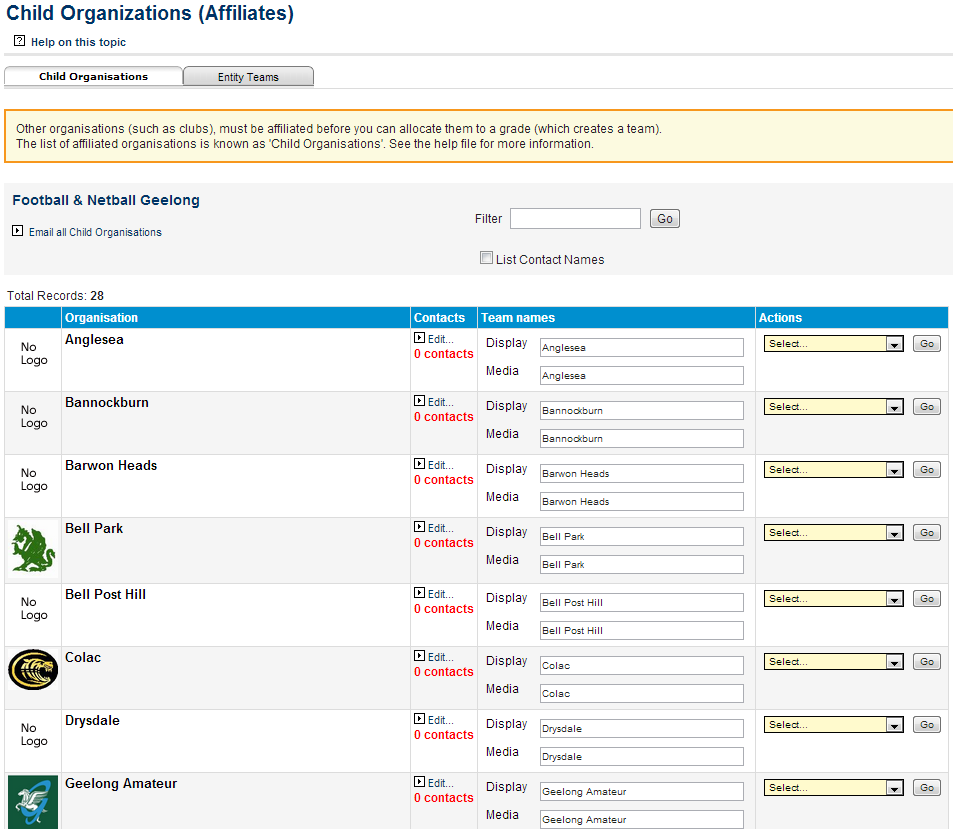
This page allows you to set up contacts for each of your member organisations as well as create club administrator user ids or perform admin tasks on behalf of clubs.
Teams Managed by this Organisation
| Info |
|---|
| MODE: Competition Management MENU: Competition -> Teams and Affiliates -> Maintain Entity Teams |
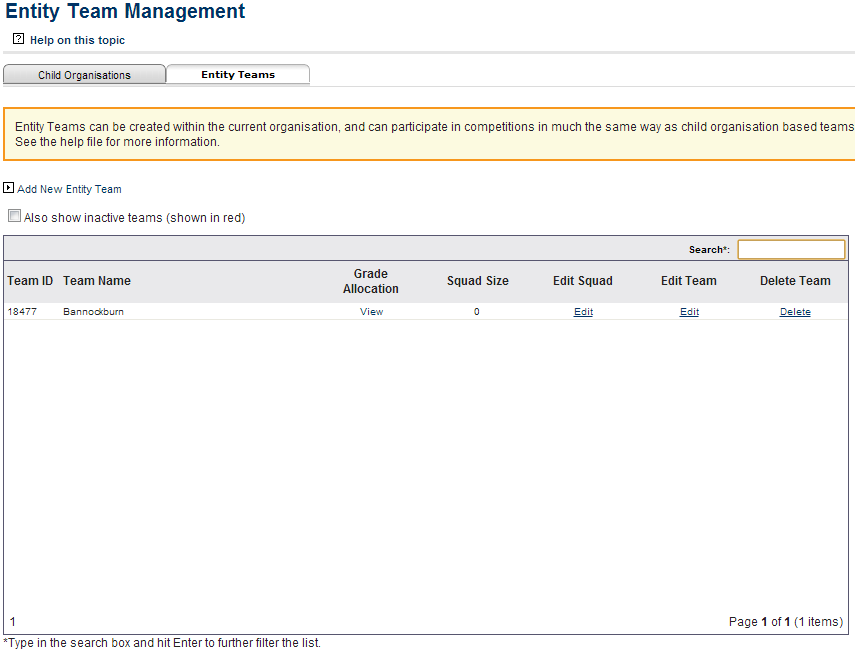
This page allows associations to create their own independent teams, with no club affiliation required.
To create a new entity team click the add new entity team link. Enter a team name and click update to save. This team will now be available on the allocate teams to grades page and players can be selected through the edit entity teams page.
Step 7: Team Nomination
| Note |
|---|
Team nomination is only required by organisations that want their affiliate clubs or participants to nominate their own teams. If this information is being provided to the association by other means and manually re-entered this step can be skipped. |
| Info |
|---|
| MODE: Competition Management MENU: Competition -> Teams and Affiliates -> Team Nomination |
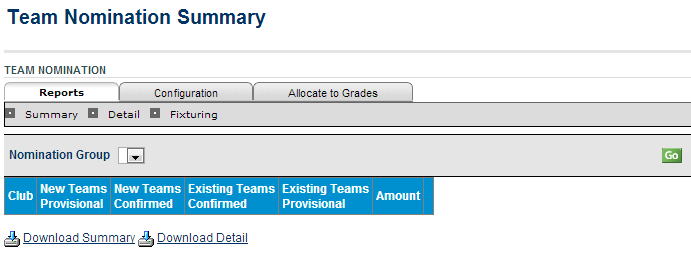
Configure the categories that teams can be entered in and use these to create a registration form that will be available to Club admin users and can be made available through member sign up forms
...
Affiliate clubs will be able to Nominate teams from the opening date set on this form. Team nominations can be made directly by participants to association's by syndicating
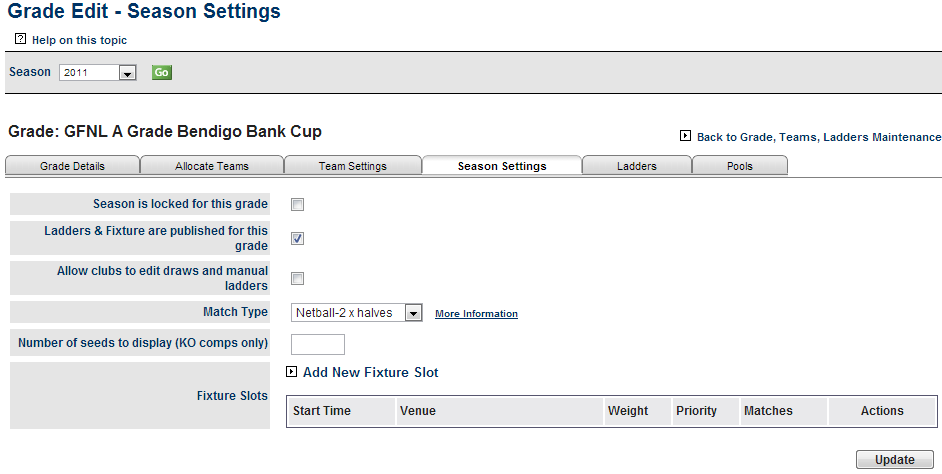
Step 8: Manage Grades
| Info |
|---|
| MODE: Competition Management MENU: Competition -> Grades -> Maintain Grades Teams and Ladders |
...

Create the grades that will be open for competition in the current season. Data from previous seasons can be rolled over when a new season begins.
| Info | ||
|---|---|---|
If you are going to use fixture slots to create your draws it is advisable that you add these to your grades at this point in time.
To create a fixture slot for a grade, click on the Add New fixture slot link. Select an available start time and appropriate venue to set as a fixture slot to be used by this grade. The weighting will determine the order in which matches are allocated to this slot, Higher weighting moves a slot up the order. Priority is used to determine the allocation order between fixture slots with the weighting. A lower priority value will make push the slot up the priority order list. Fixture slots created this way will be used by default when creating fixtures for the configured grades. |
...
Step 9: Create Grade Divisions
| Info |
|---|
| MODE: Competition Management MENU: Competition -> Grades -> Maintain Grade Divisions |
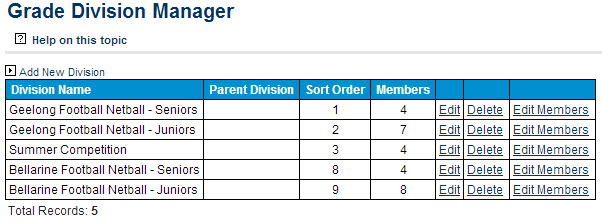
Grade divisions provide a means of organising your list of grades. These divisions can be used to filter grades on a number of admin pages and will determine the way that grades appear in drop down lists in the public portal.
Step 10: Manage Squad Lists
| Info |
|---|
| MODE: Competition Management MENU: Competition -> Grades -> Maintain Grades, Teams and Ladders... Team Settings... Edit (squad list column) |
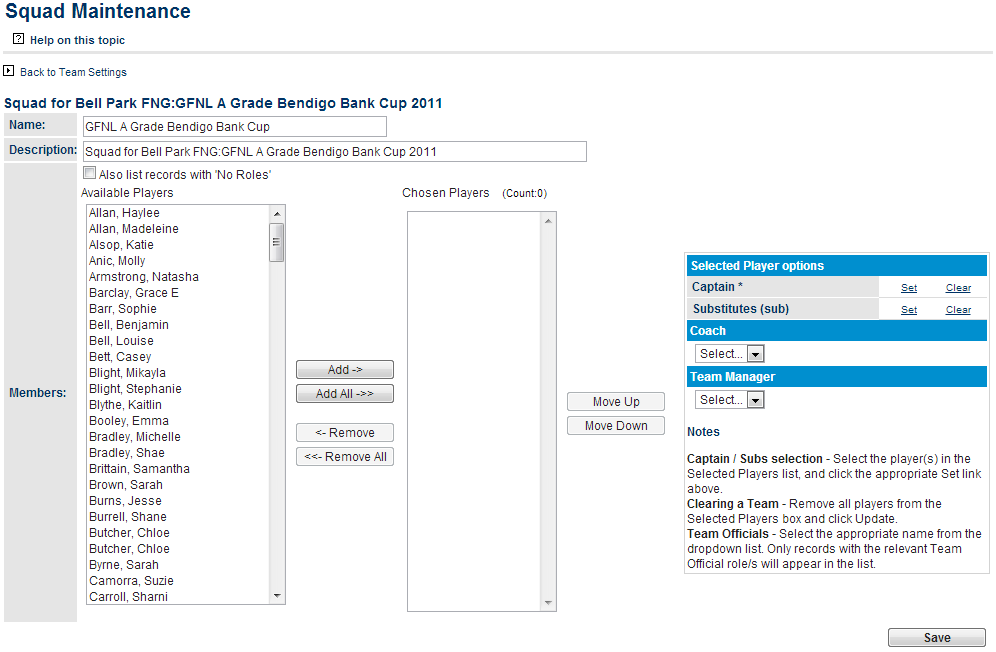
Changes can be made to squad lists after nominated teams are allocated to grades.
Step 11: Allocate Teams to Grade
| Note |
|---|
There are two different approaches to this task depending on whether or not team nomination has been used. |
If a team nomination form has not been used
| Info |
|---|
| MODE: Competition Management MENU: Competition -> Grades -> Maintain Grades Teams and Ladders... Allocate Teams |
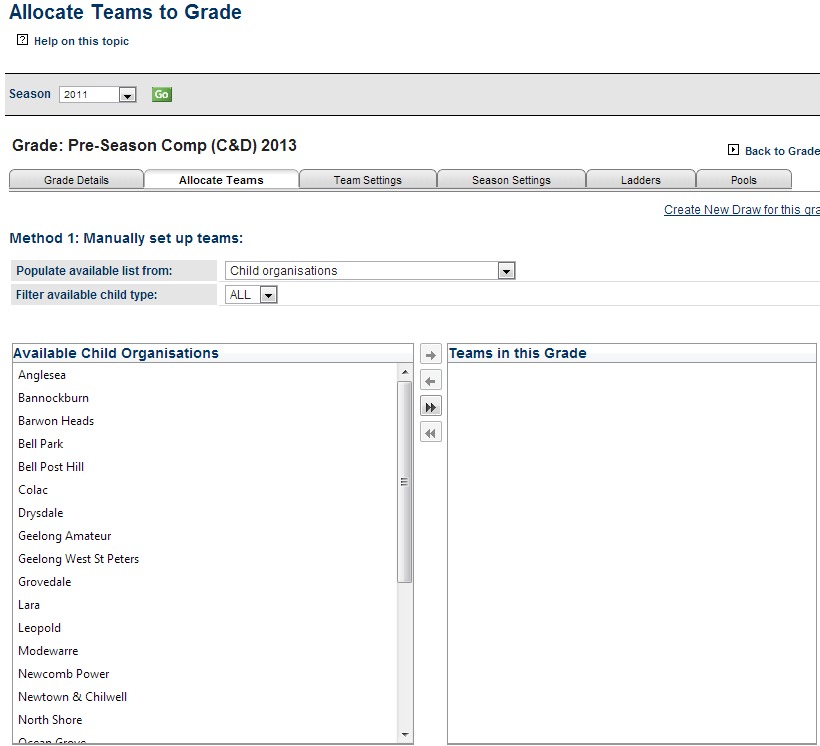
Allocate teams into grades. Other grade configuration options are applied at this step including Ladder point and Display schemes. Navigating to the team settings tab allows for more in depth team configuration such as default (home) venues and starting times and Fixture display and Media report names.
If a team nomination form has been used
| Info |
|---|
| MODE: Competition Management MENU: Competition -> Grades -> Team Nominations... Allocate to Grades |
Step 12: Create Fixtures
MODE: Competition Management MENU: Competition -> Draws -> Create Draw
Create the fixtures.
Configure Start Times
You should add all of the times that will be used as match start times across all of your Venues for each day of the week.
Each Start time can be applied to multiple venues during the Draw Creation process.
Navigate: Competition > Draws > Configure Start Times |
From this screen click on the add new start time link to open the start time editor.
Select the day from the drop down list and enter a time. The sort order arranges your list of Start Times from
lowest (top) to highest (bottom).
You can add as many Start Times as required. If you wish to change an existing start time you can do so by
clicking on the edit link in the right hand column of your Start Time list.
Create Fixtures
Fixture slots can be created and assigned to each individual grade on a season by season basis.
Navigate: Competition > Grades > Maintain Grades, Teams and Ladders. Select the 'Season' link for the appropriate grade from the grades table. |
To add a new slot to a season click on the 'Add New Fixture Slot' link
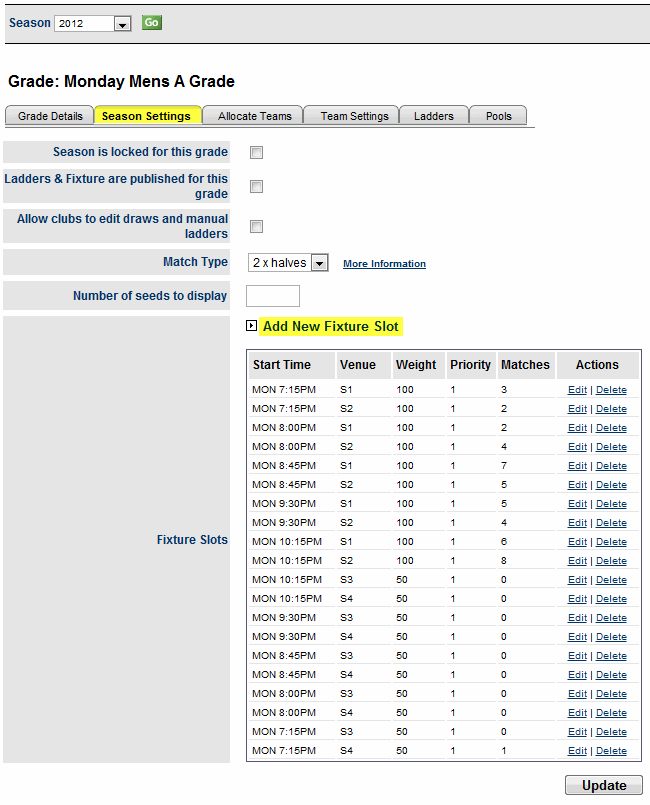
Set the time and venue that you wish to make available for this grade and if required adjust the weighting that will
be given to this slot when creating fixtures
100 is the highest priority and 0 the lowest. Equally prioritised slots will have the same chance of being assigned in a fixture. You can add multiple slots without closing the dialogue box, just change the settings and click 'Update' again to add additional slots. |
Draw Creation - General Settings
Once your Start Times have been created you can create your draws.
Navigate: Competition > Draw > Create Draw |
The Start Page is used to input the general settings of your fixture and can be broken down into the following sections.
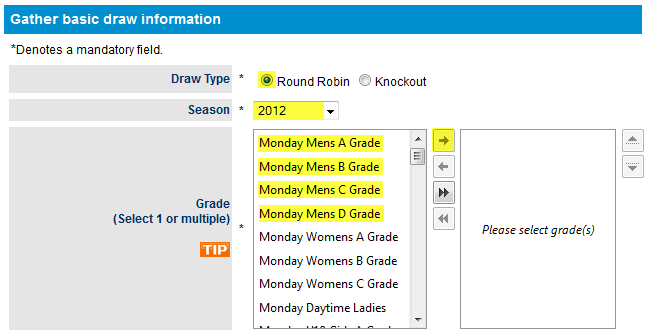
Basic Draw Information
Set the type of draw you wish to use, the season and the grades (1 - many) that you wish to create fixtures for.
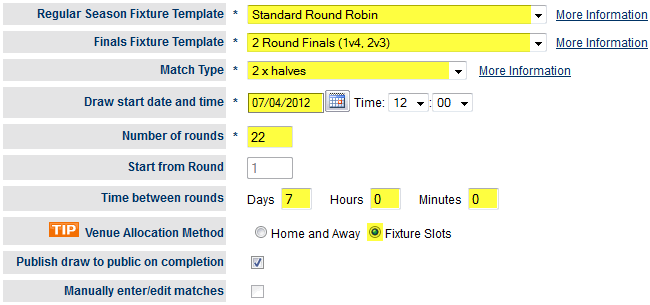
The fixture templates and match types available in your drop down lists have been pre-loaded.
The Start Date used should be the Monday of the first week of your fixture.
Start time is not relevant when using fixture slots and will be superseded by the Start Times configured earlier. |
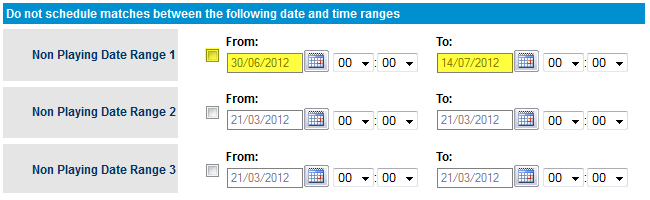
If there are breaks in your fixture you can specify them next. Begin the date range from the day after the last match
and end it on the day before the next match for best results.
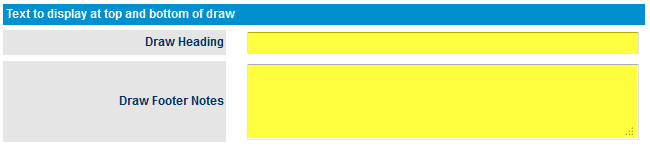
Headers and Footers can be added to the draws as well.
Draw Creation - Round Settings, Dates and Times
The next steps involve confirming the round dates and times generated by the settings entered on the previous page.
Round Settings
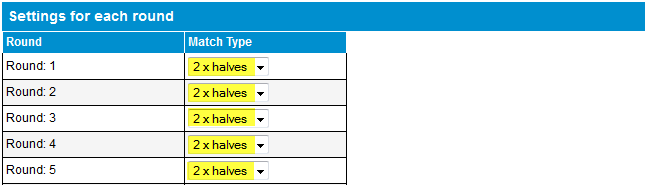
You can confirm the selected match type on this page. If desired different match types can be used from round to round.
Dates and Times
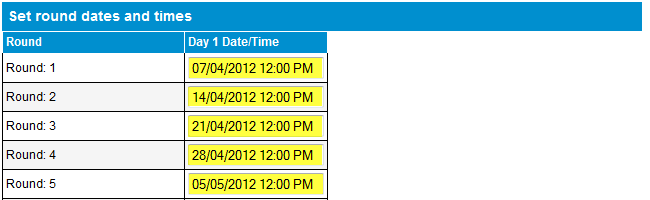
The starting date and time in each round can be modified on this page.
When working with Fixture Slots the Starting times used will always be |
Draw Creation - Fixture Slot Allocation
Create pairings of each available Start Time and Venue and apply a weighting to each pair indicating
its preference for allocation.
When applying weighting to a Fixture Slot 100 is the highest order of preference and 0 is the lowest. Setting all weightings to the same level will ensure an even distribution of matches |
If fixture slots have been assigned for the season you can skip this step |
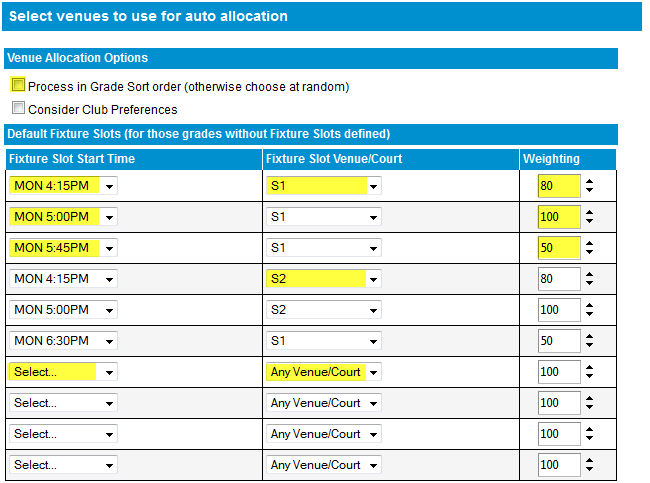
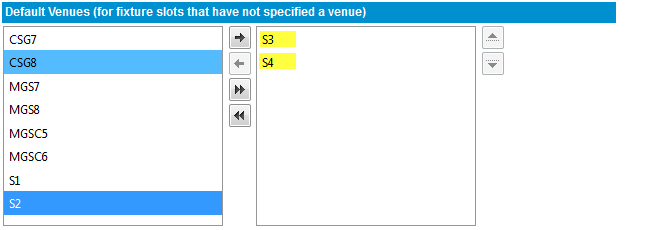
If a Start Time is allocated to Any Venue/Court matches will be allocated to any venues specified in the
Default Venues list (below) at that time.
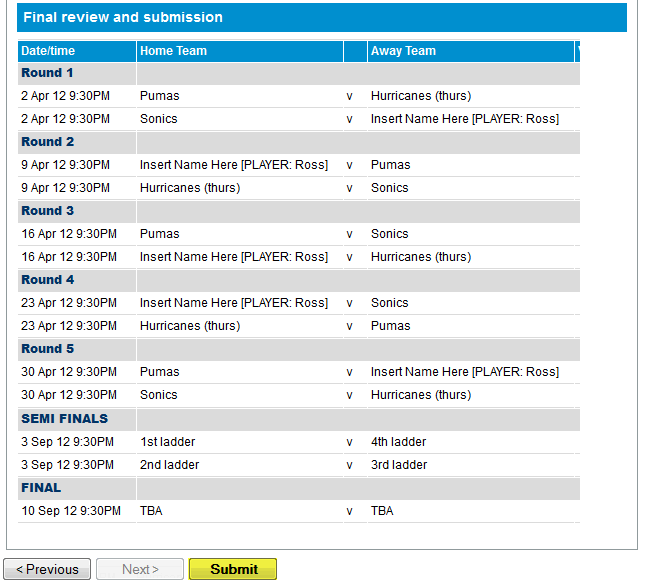
Draw Creation - Review and Submit
The last step is checking the generated fixture to ensure it meets your requirements.
You can return to any step in the process by clicking on the title in the progress bar displayed at the top of the page. |

When the Fixture is suitable click on the submit button to save it.
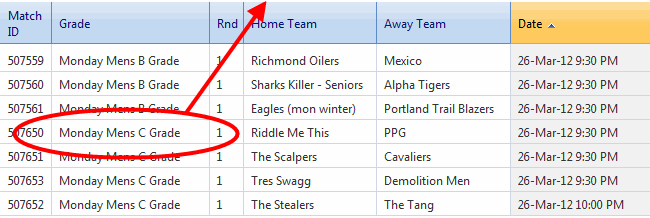
Match Scheduler
The match scheduler is used to quickly make changes to fixtures.
Navigate: Competition > Venues > Venue Scheduler |
Matches are moved to different Start Times and Venues with a drag and drop interface.
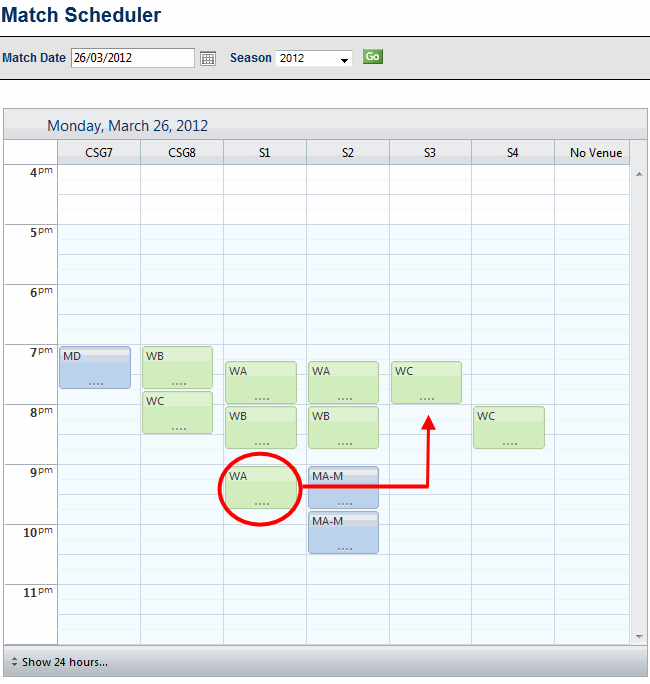
Matches that do not have a Venue (listed below) assigned can be dragged into the display and allocated to an
empty slot.
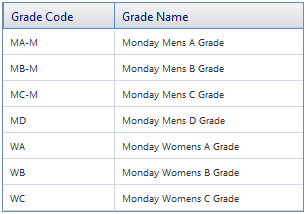
Grade Types are organised by colour and a Grade Key can be found at the bottom of the page which defines
each grade's short name.
All changes are saved as they are made, there is no need to update when you are done.
Activate Finals
When the home and away season reaches its end the automatic finals allocation can be activated.
Teams will be assigned to the finals slots based on the criteria set in the Finals Fixture Template used.

Clicking on the Activate Finals button will begin the process.
Please ensure that all match results for the season have been entered prior to activating the finals. |
Support
Online Help documentation
Each page on ResultsVault has a detailed help file, specific to that task, which will guide you through each step – click on the <help on this topic>.
InteractSport Support Centre
The InteractSport online support centre allows you to:
...
Please visit: http://support.interactsport.com/